Start with MP recovery, the attacks that open your class follow-ups and the defense or healing your role needs. Select unlocked specializations, equip Stigmas within your slots and practice the loop manually before adding a repeating combo.
Choose a starting build for any class
| Class guide | Core build decision | First useful upgrade |
|---|---|---|
| Gladiator | MP sustain and frontline damage; preserve block when tanking | Keen Strike MP recovery, then its Ruinous Blow cooldown option |
| Templar | Judgment triggers, threat and shield timing | Vicious Strike → Warding Strike and Pummel → Punishment cooldown options |
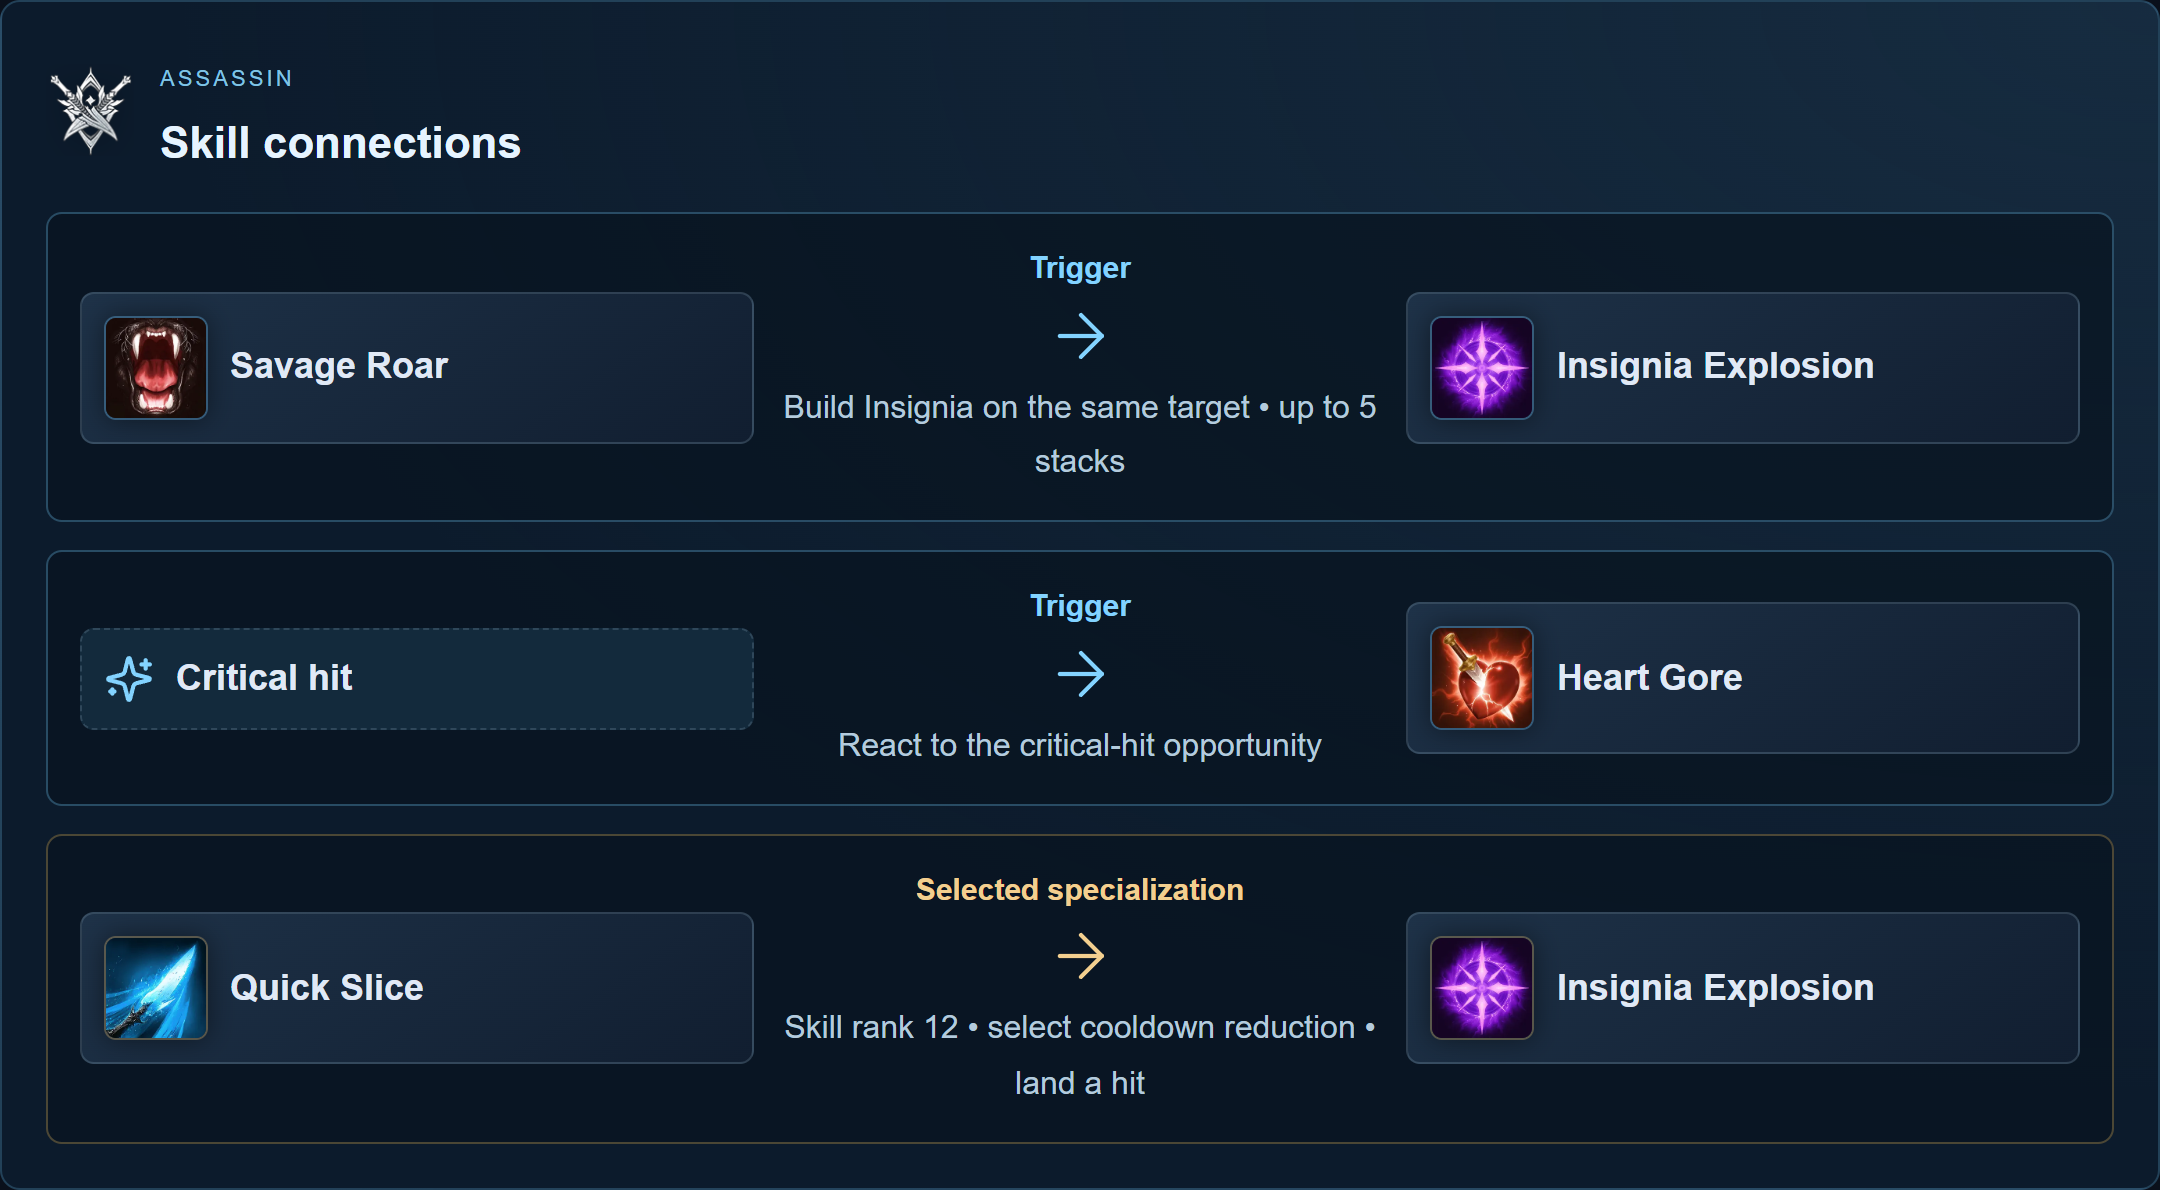
| Assassin | Back attacks and target-bound Insignia stacks | Quick Slice sustain and Insignia Explosion cooldown; Heart Gore for critical windows |
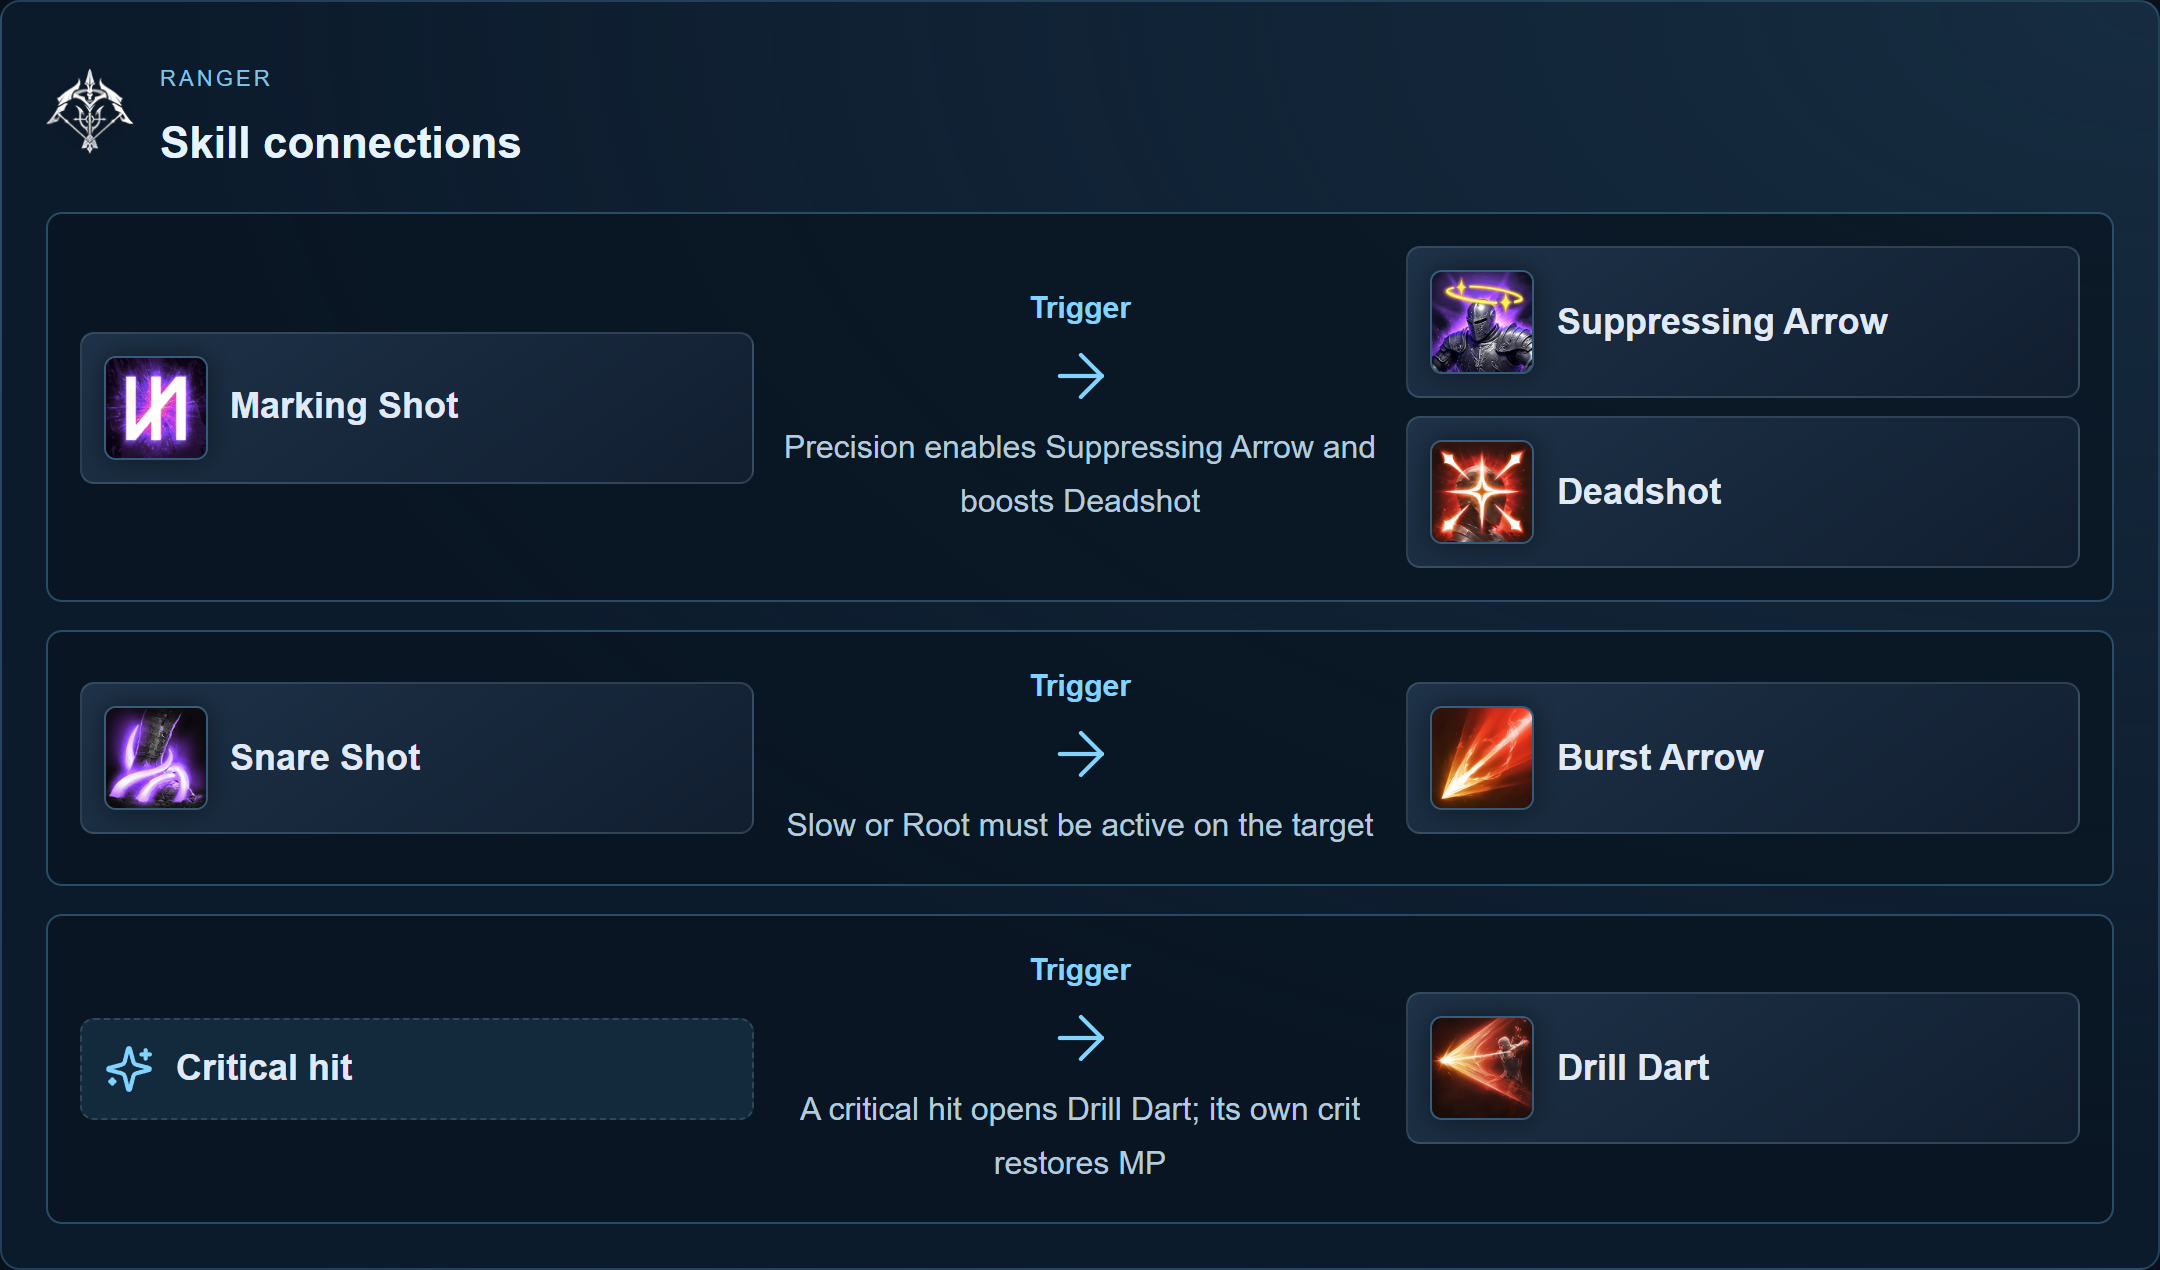
| Ranger | Range, critical follow-ups and Deadshot availability | Snipe MP recovery and on-hit Deadshot cooldown reduction |
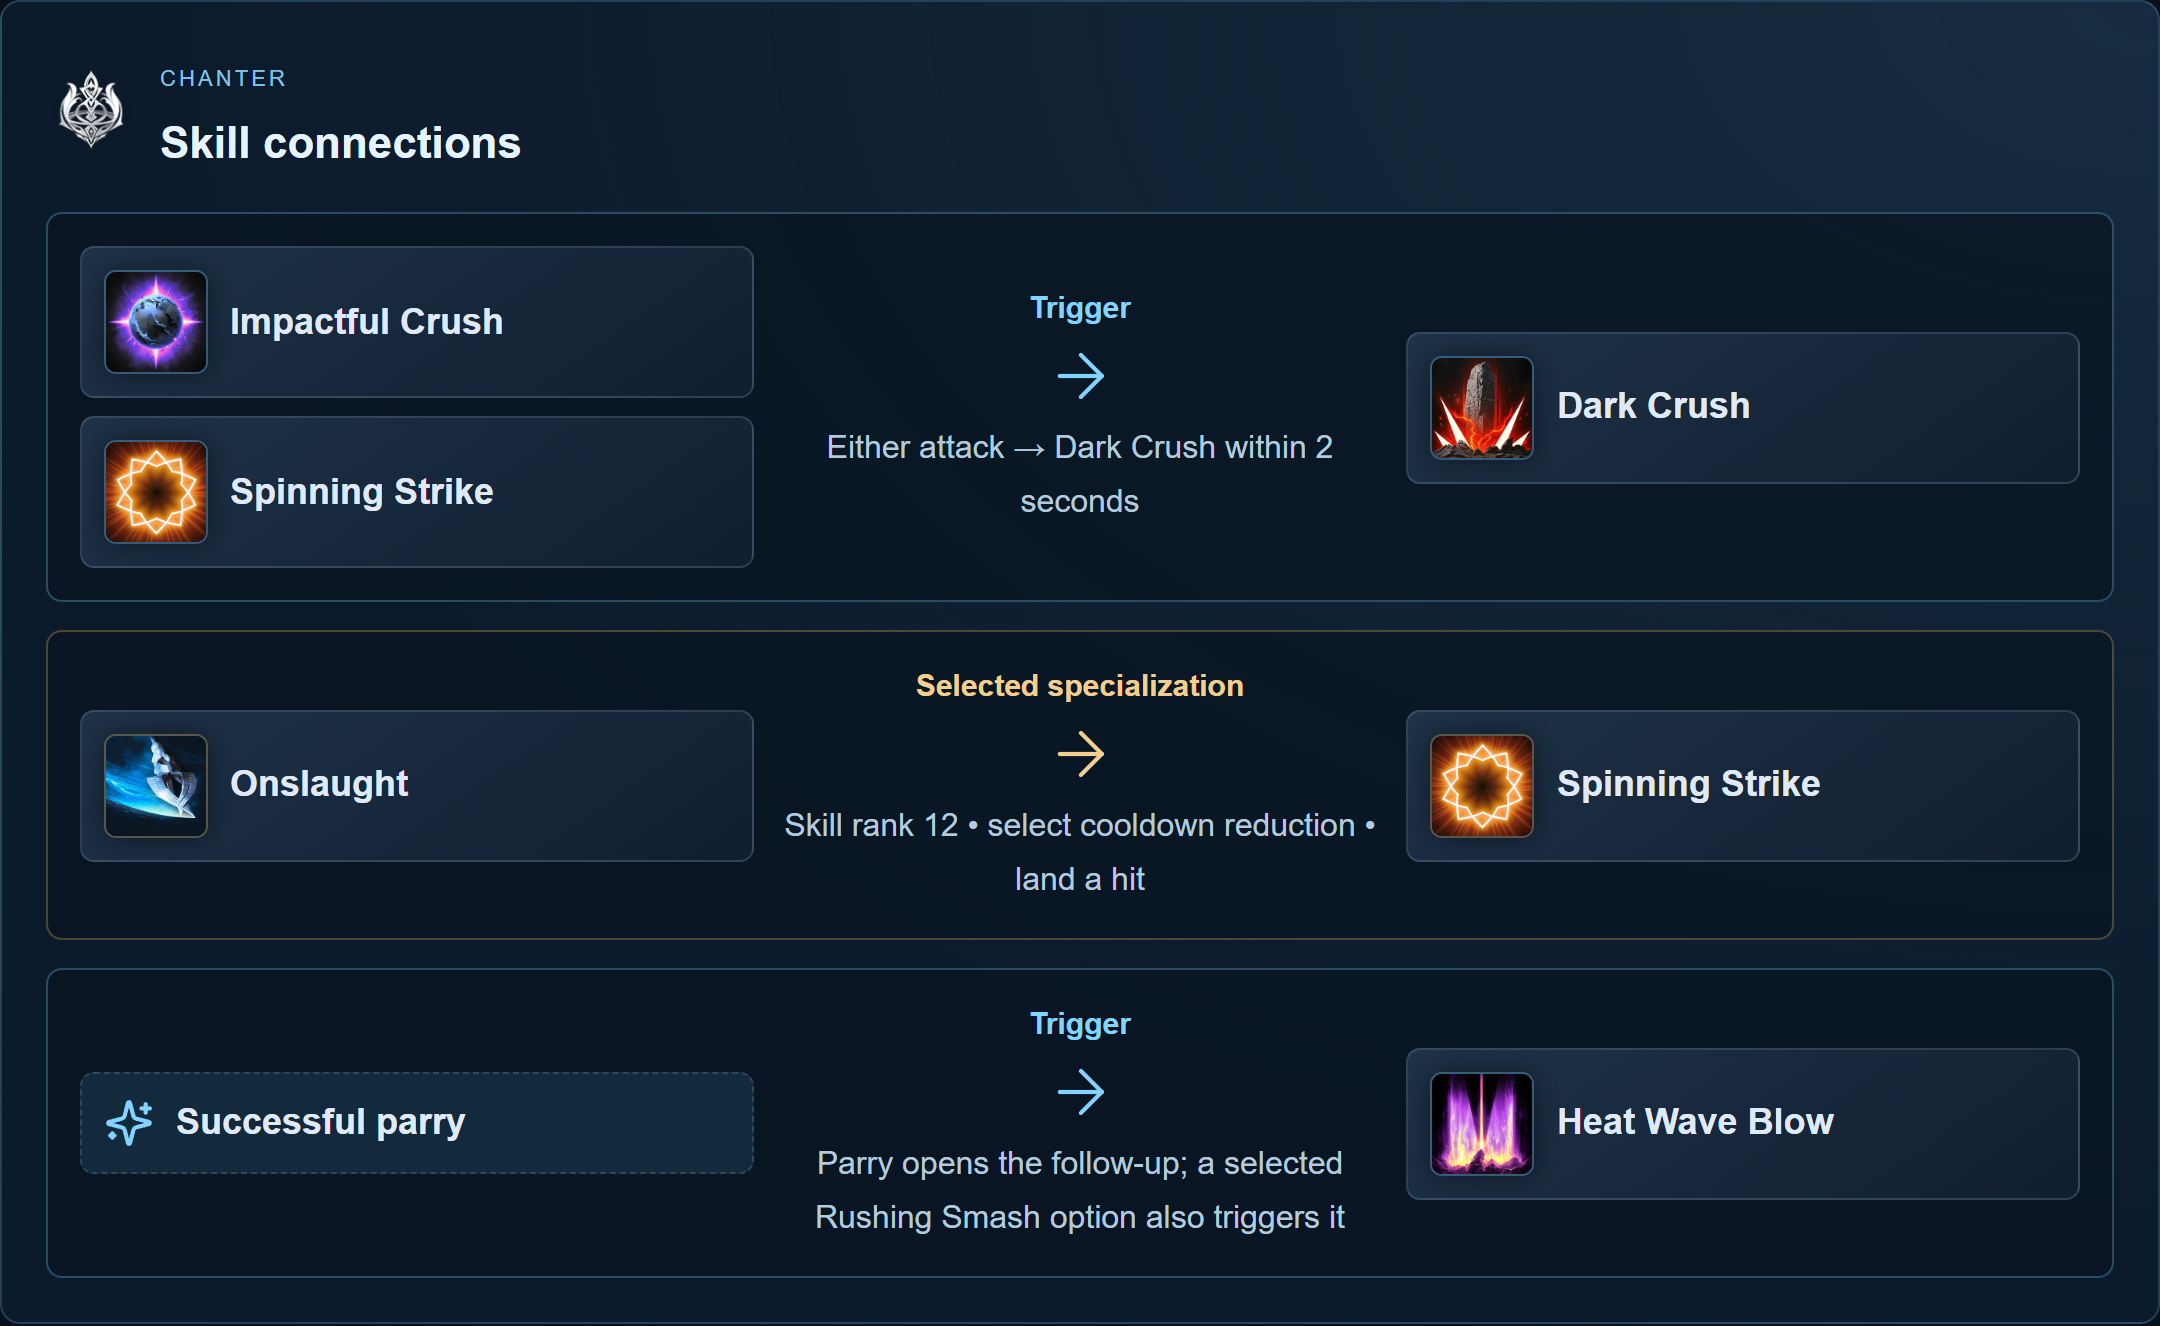
| Chanter | Dark Crush windows plus party mantras | Spinning Strike cooldown and Dark Crush options; add recovery for healer duty |
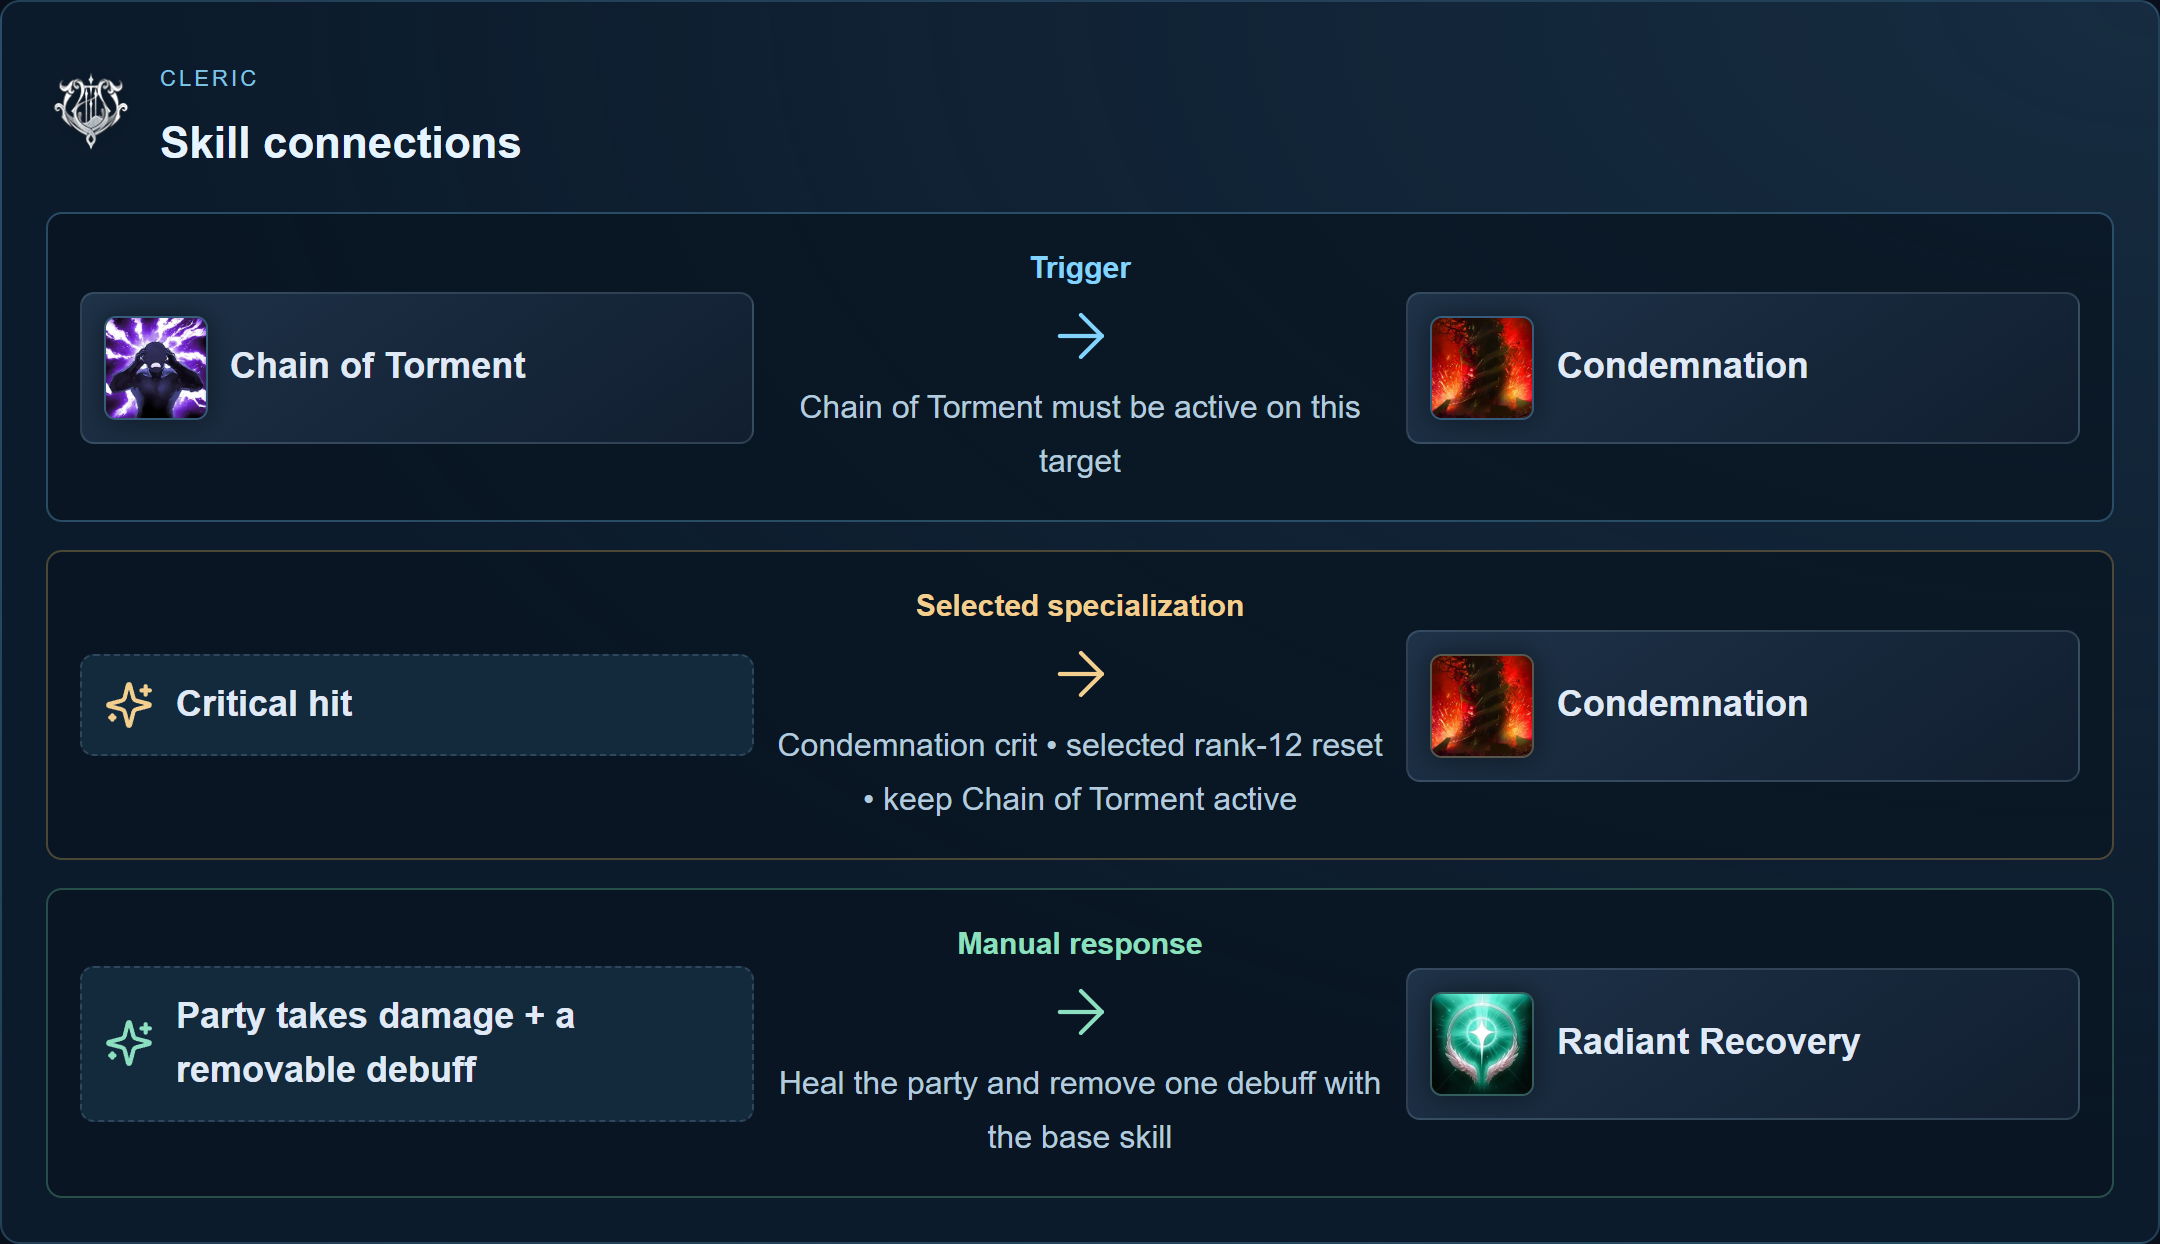
| Cleric | Automatic direct healing, cleanse and safe damage | Radiant Recovery choices and Condemnation’s critical reset when damage is sustainable |
| Sorcerer | Completed charges and mana-dependent passives | Firestorm → Hellfire and Ice Chain → Winter’s Shackles cooldown options |
| Spiritmaster | Active spirit, short procs and Four Elements | Cold Shock sustain, summon upgrades and Elemental Fusion options |
Match skill ranks to your progression
A character level unlocks a skill or its next purchased rank. A skill rank unlocks specialization choices: many active skills open options at ranks 8, 12 and 16, but each skill has its own thresholds. A rank-12 example does not mean character level 12.
Select the specialization after reaching its threshold. Options offered in the same slot are alternatives. For example, Sorcerer's rank-8 Hellfire can favor faster casting, damage over time or mobile casting; one choice does not supply all three.
Record purchased ranks separately from bonus ranks supplied by equipment, Arcana and Daevanion. A later build may reach a threshold your current points and bonuses cannot. Preserve the lower-rank loop until you can reproduce the selected effect.
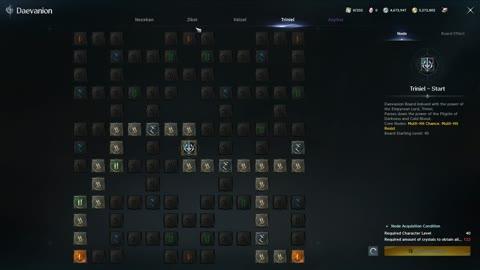
Check your visible Stigma slots and available upgrade points. Learning another Stigma does not create an equipment slot. On the Daevanion board, locate the required skill effect and count the route’s total cost before spending points.
Select skill options, equip your role tools, and practice the loop manually.
- Match the context
Record region, level, activity, and whether your party supplies healing or overlapping buffs.
- Select actual skill options
Spend within your budget, then explicitly choose the unlocked specialization used by the example.
- Equip the role tools
Fill only visible Stigma slots and keep the recovery or defensive tool your job requires.
- Test the interaction
Manually test the expected trigger or reset before adding a repeating attack sequence.
- Save and change one part
Record selected options and retest one failed interaction or missing party function at a time.
Skills, Stigmas, Daevanion and equipment
| Build layer | What to do |
|---|---|
| Active skills | Fund the ordinary attack, main damage and recovery that you actually use. Sustain comes before a longer chain that immediately empties MP. |
| Specializations | Select the required cooldown, resource, mobile or trigger effect. Check its rank threshold and the slot it occupies. |
| Passives | Match the trigger to your loop: Assassin back damage, Ranger critical procs, Spiritmaster spirit hits or Chanter attack-built shields. |
| Stigmas | Equip role tools within the unlocked slots. Trade a damage slot for block, cleanse, healing or dispel when that missing action causes failure. |
| Daevanion | Compare total route cost to the destination skill or passive. A reached rank threshold can change a loop more than unrelated neighboring stats. |
| Equipment and Arcana | Count the skill-rank bonuses that complete your chosen options. Check whether changing an item removes a required threshold. |
At skill rank 8, choose one effect for the same specialization slot.
 HellfireSkill rank 8
Selected effect: Mobile casting. Reaching the rank unlocks the choices. Selecting one applies its effect; it does not grant the other two.
Enlarge diagram
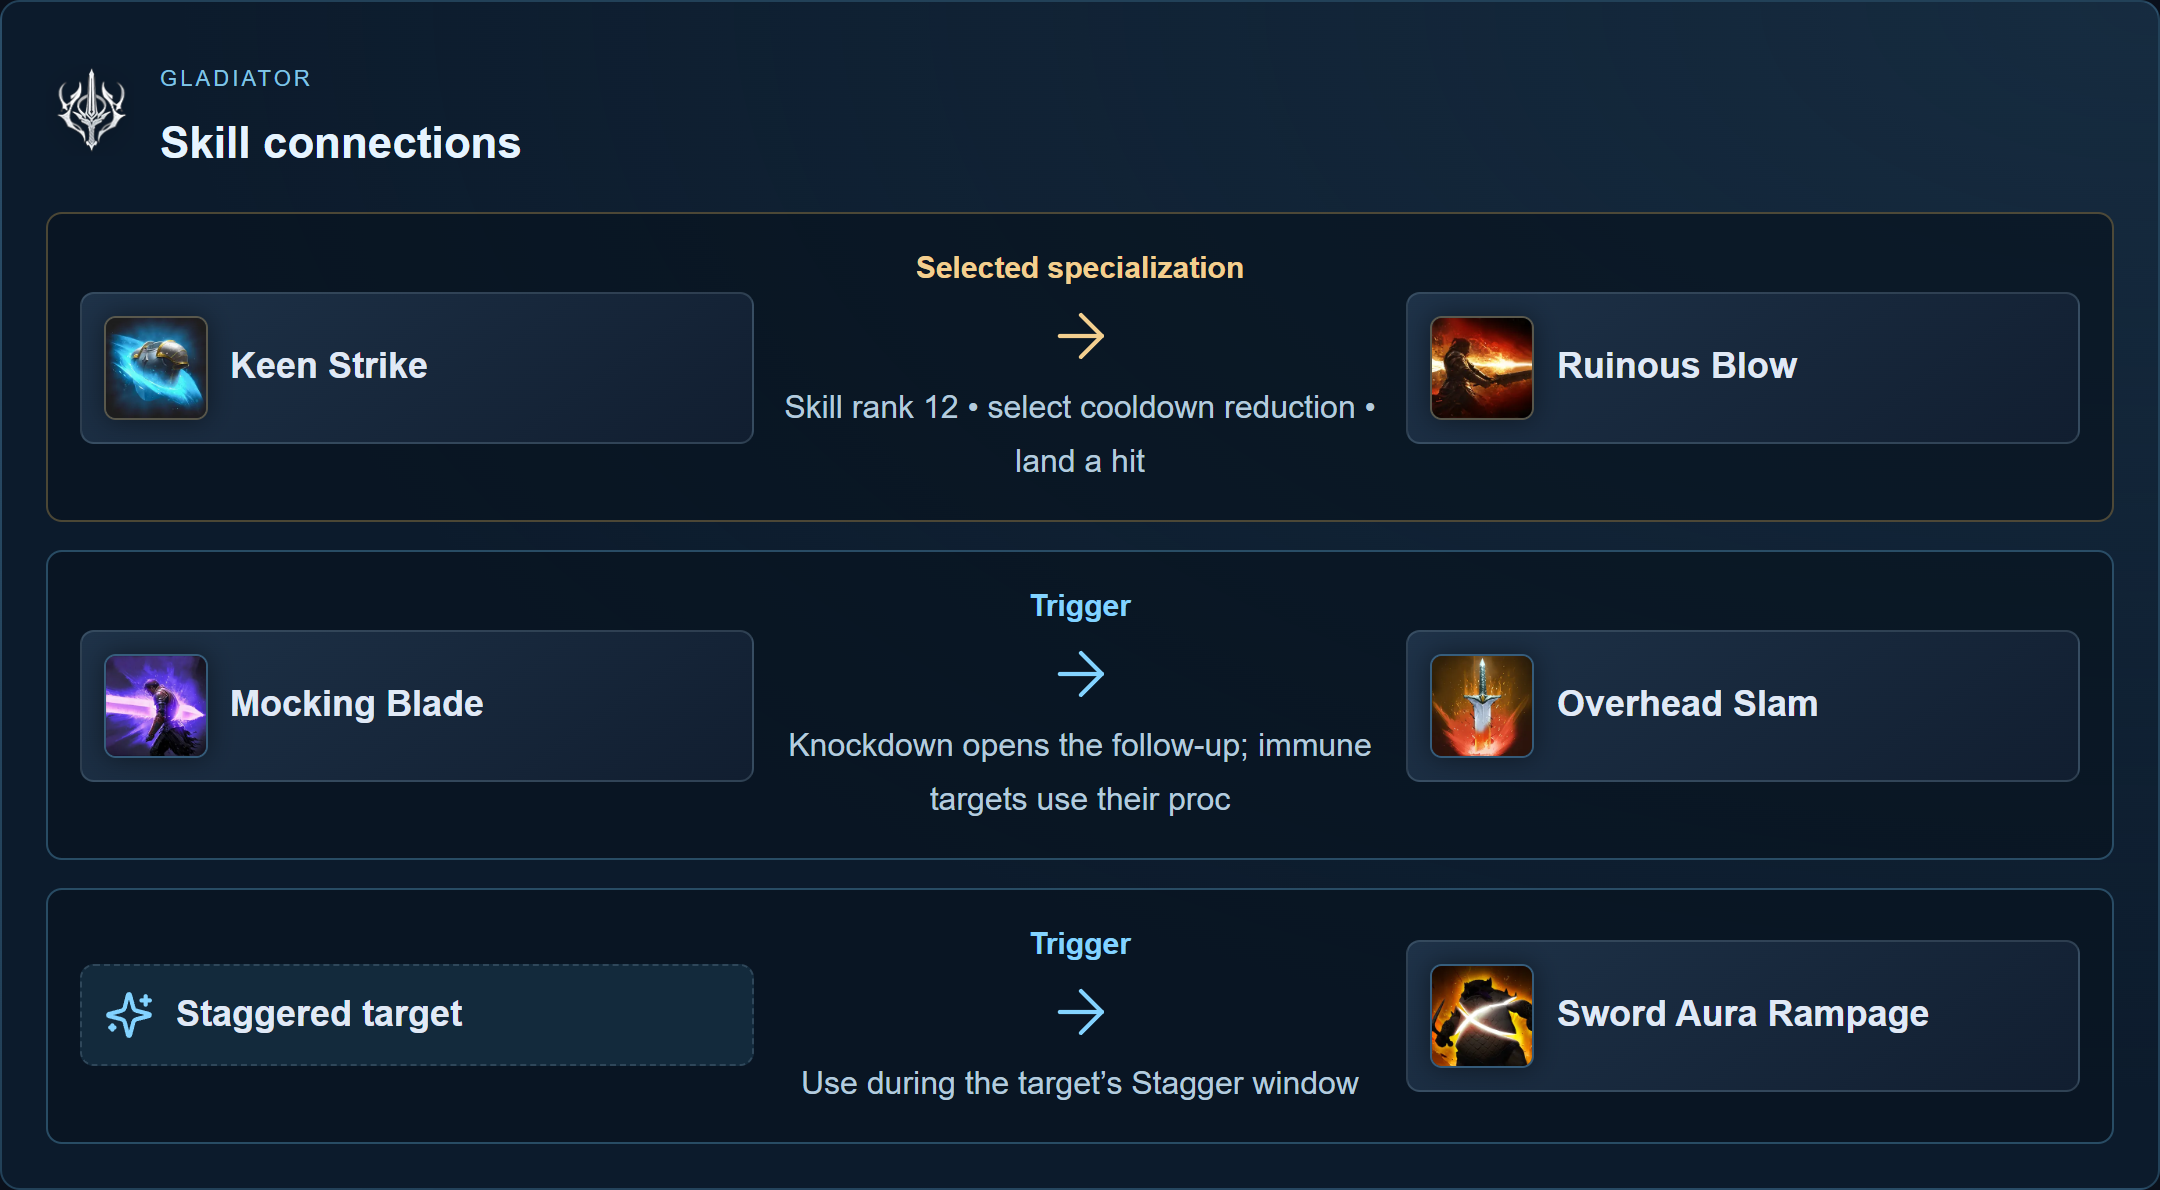
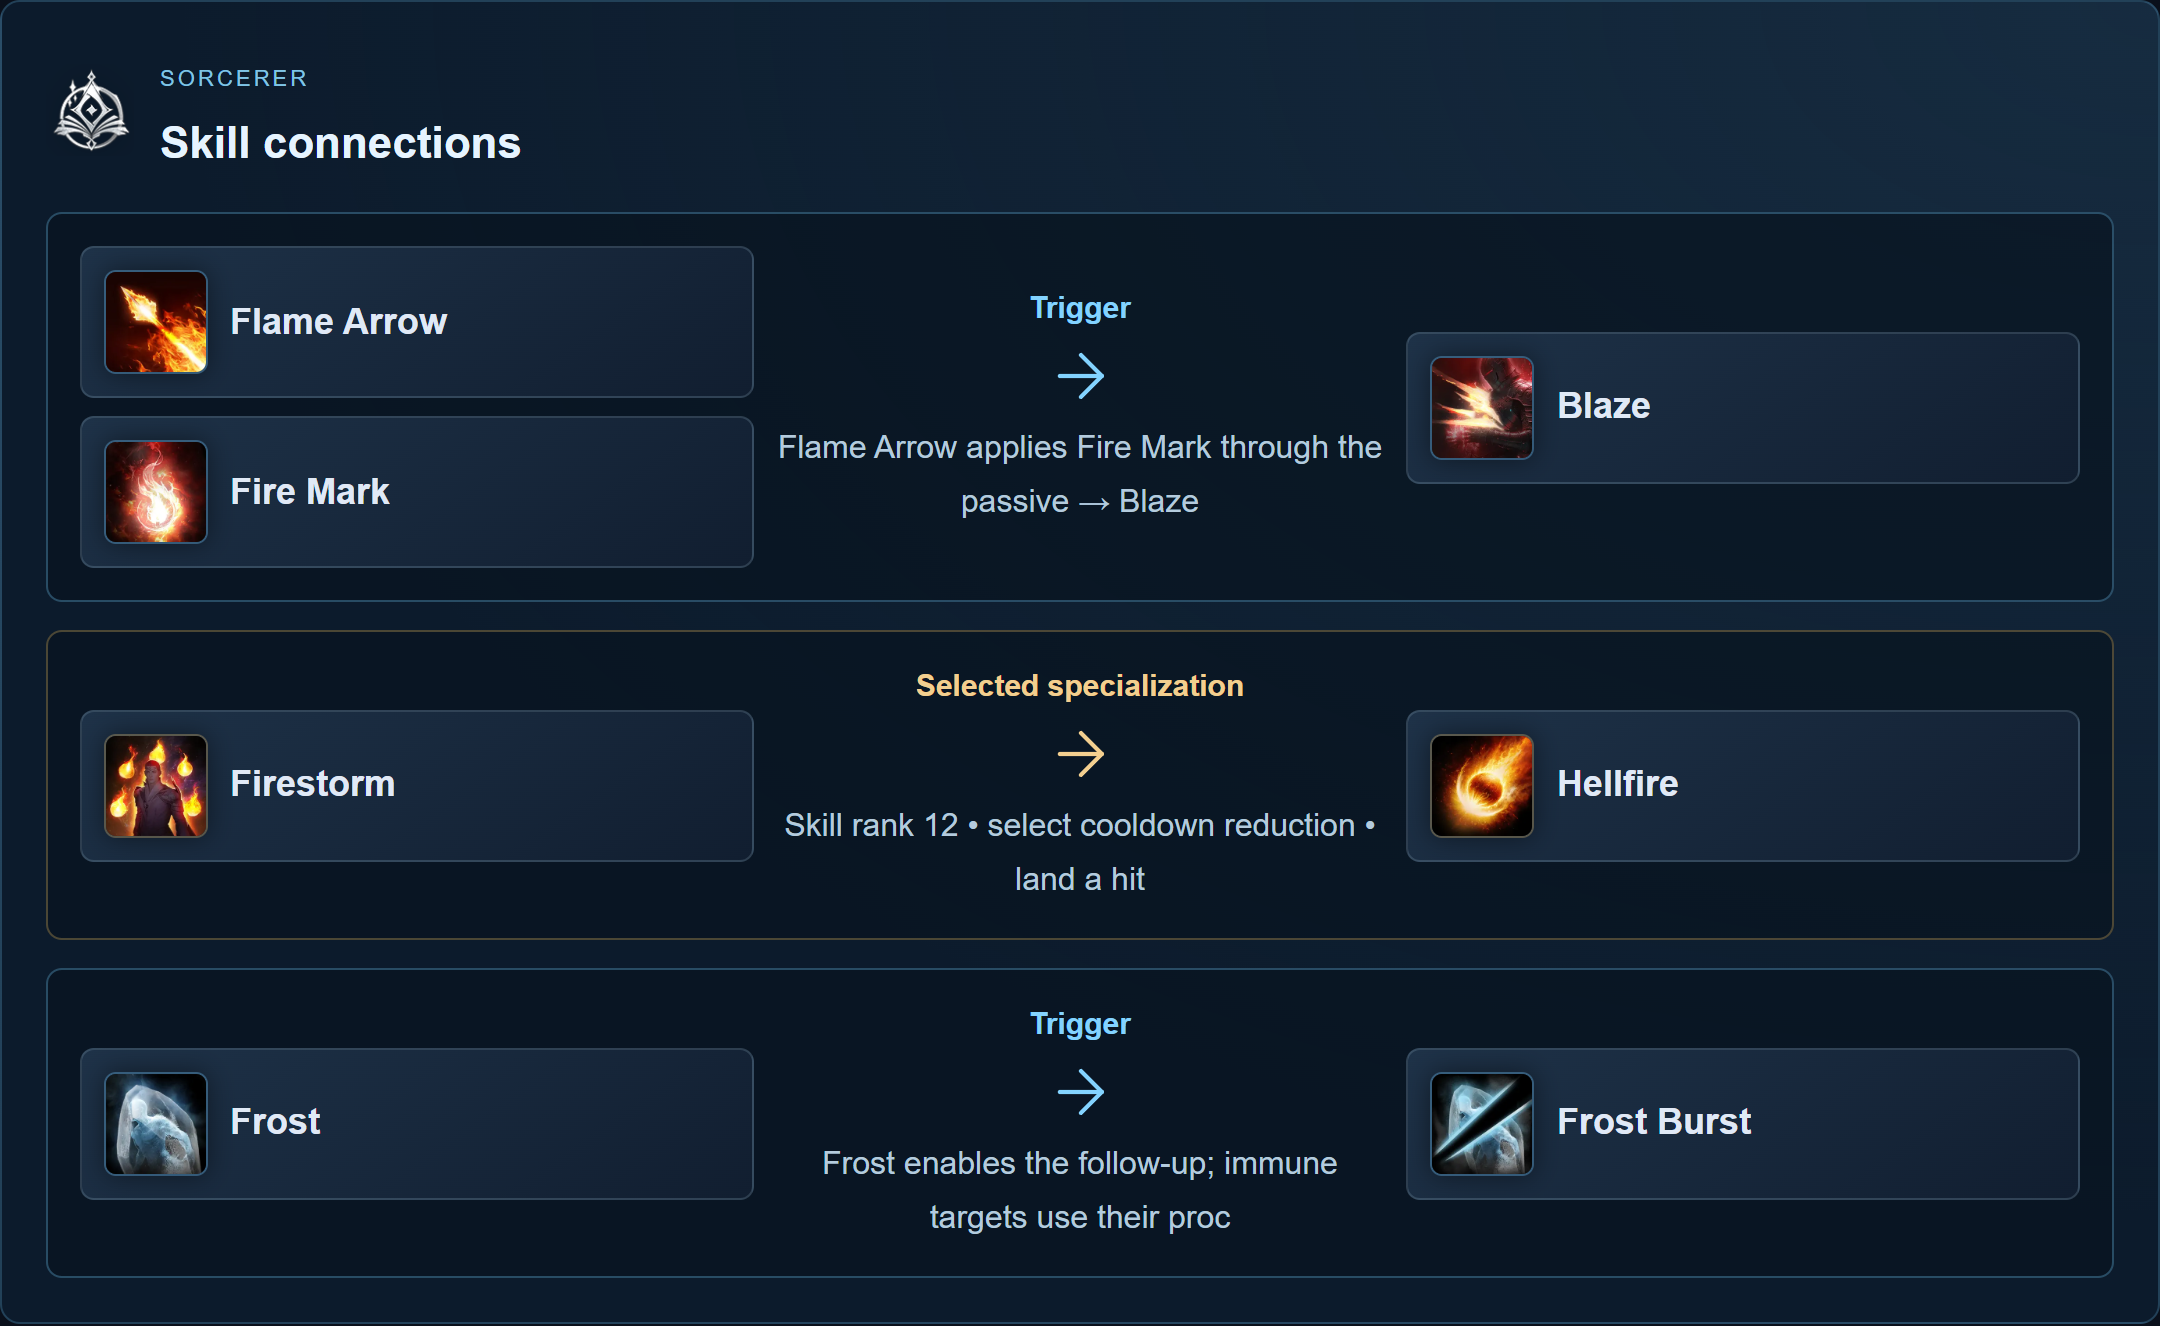
Follow the arrow to see what opens or improves the next skill. Select a skill for its full explanation.

Skill rank 12 • select cooldown reduction • land a hit





Follow the arrow to see what opens or improves the next skill. Select a skill for its full explanation.







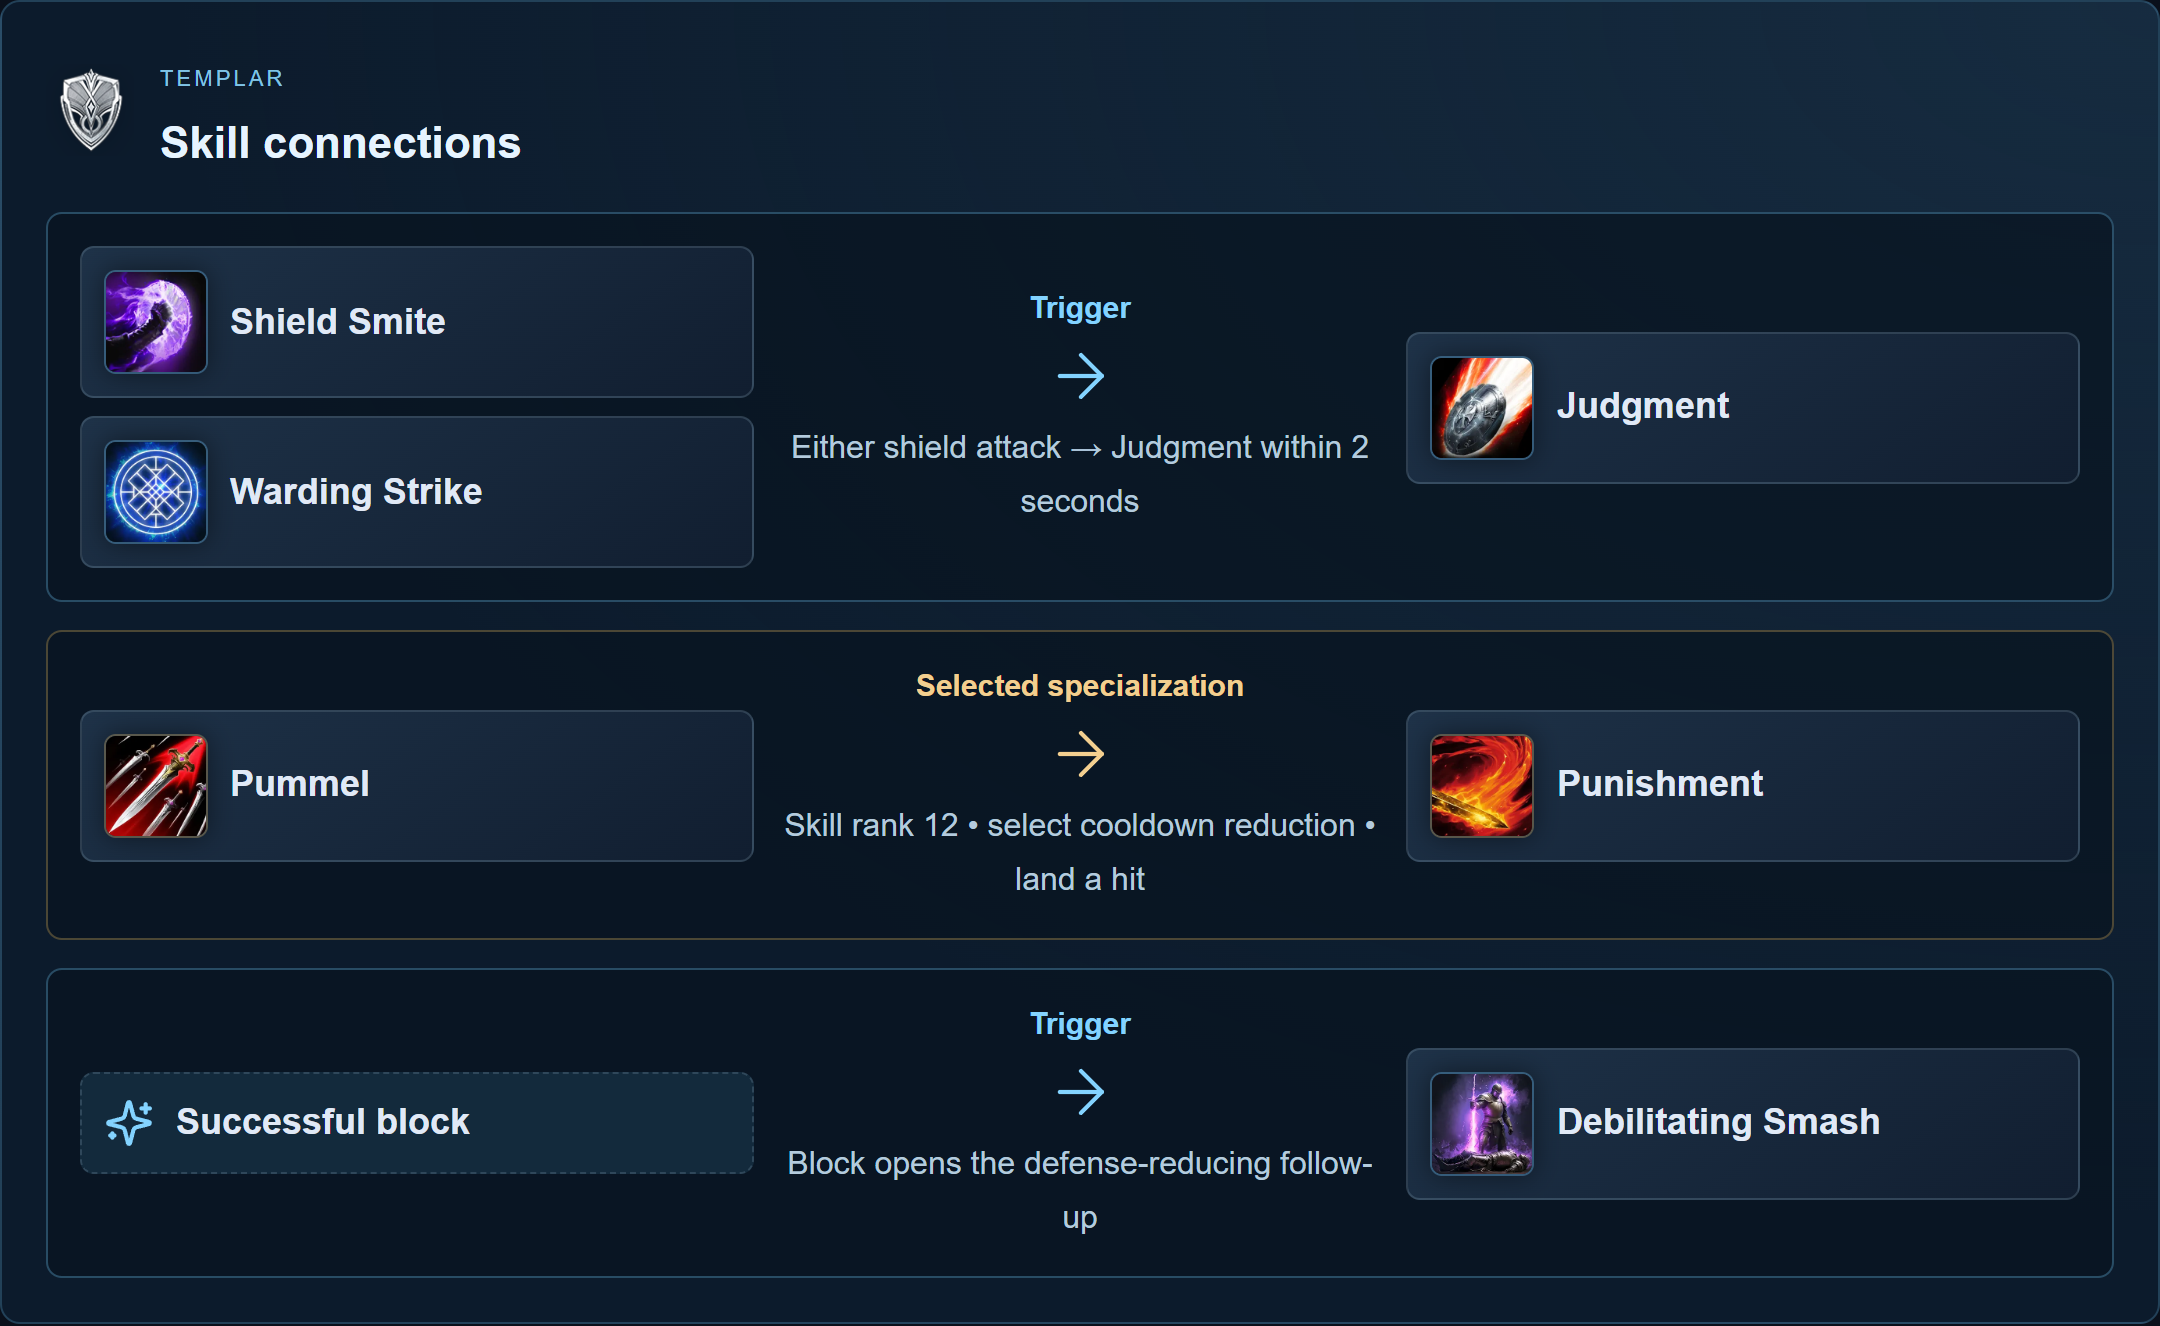
Follow the arrow to see what opens or improves the next skill. Select a skill for its full explanation.




Skill rank 12 • select cooldown reduction • land a hit

Follow the arrow to see what opens or improves the next skill. Select a skill for its full explanation.







Follow the arrow to see what opens or improves the next skill. Select a skill for its full explanation.




Skill rank 12 • select cooldown reduction • land a hit
Parry opens the follow-up; a selected Rushing Smash option also triggers it


Follow the arrow to see what opens or improves the next skill. Select a skill for its full explanation.


Condemnation crit • selected rank-12 reset • keep Chain of Torment active
Heal the party and remove one debuff with the base skill


Follow the arrow to see what opens or improves the next skill. Select a skill for its full explanation.







Follow the arrow to see what opens or improves the next skill. Select a skill for its full explanation.
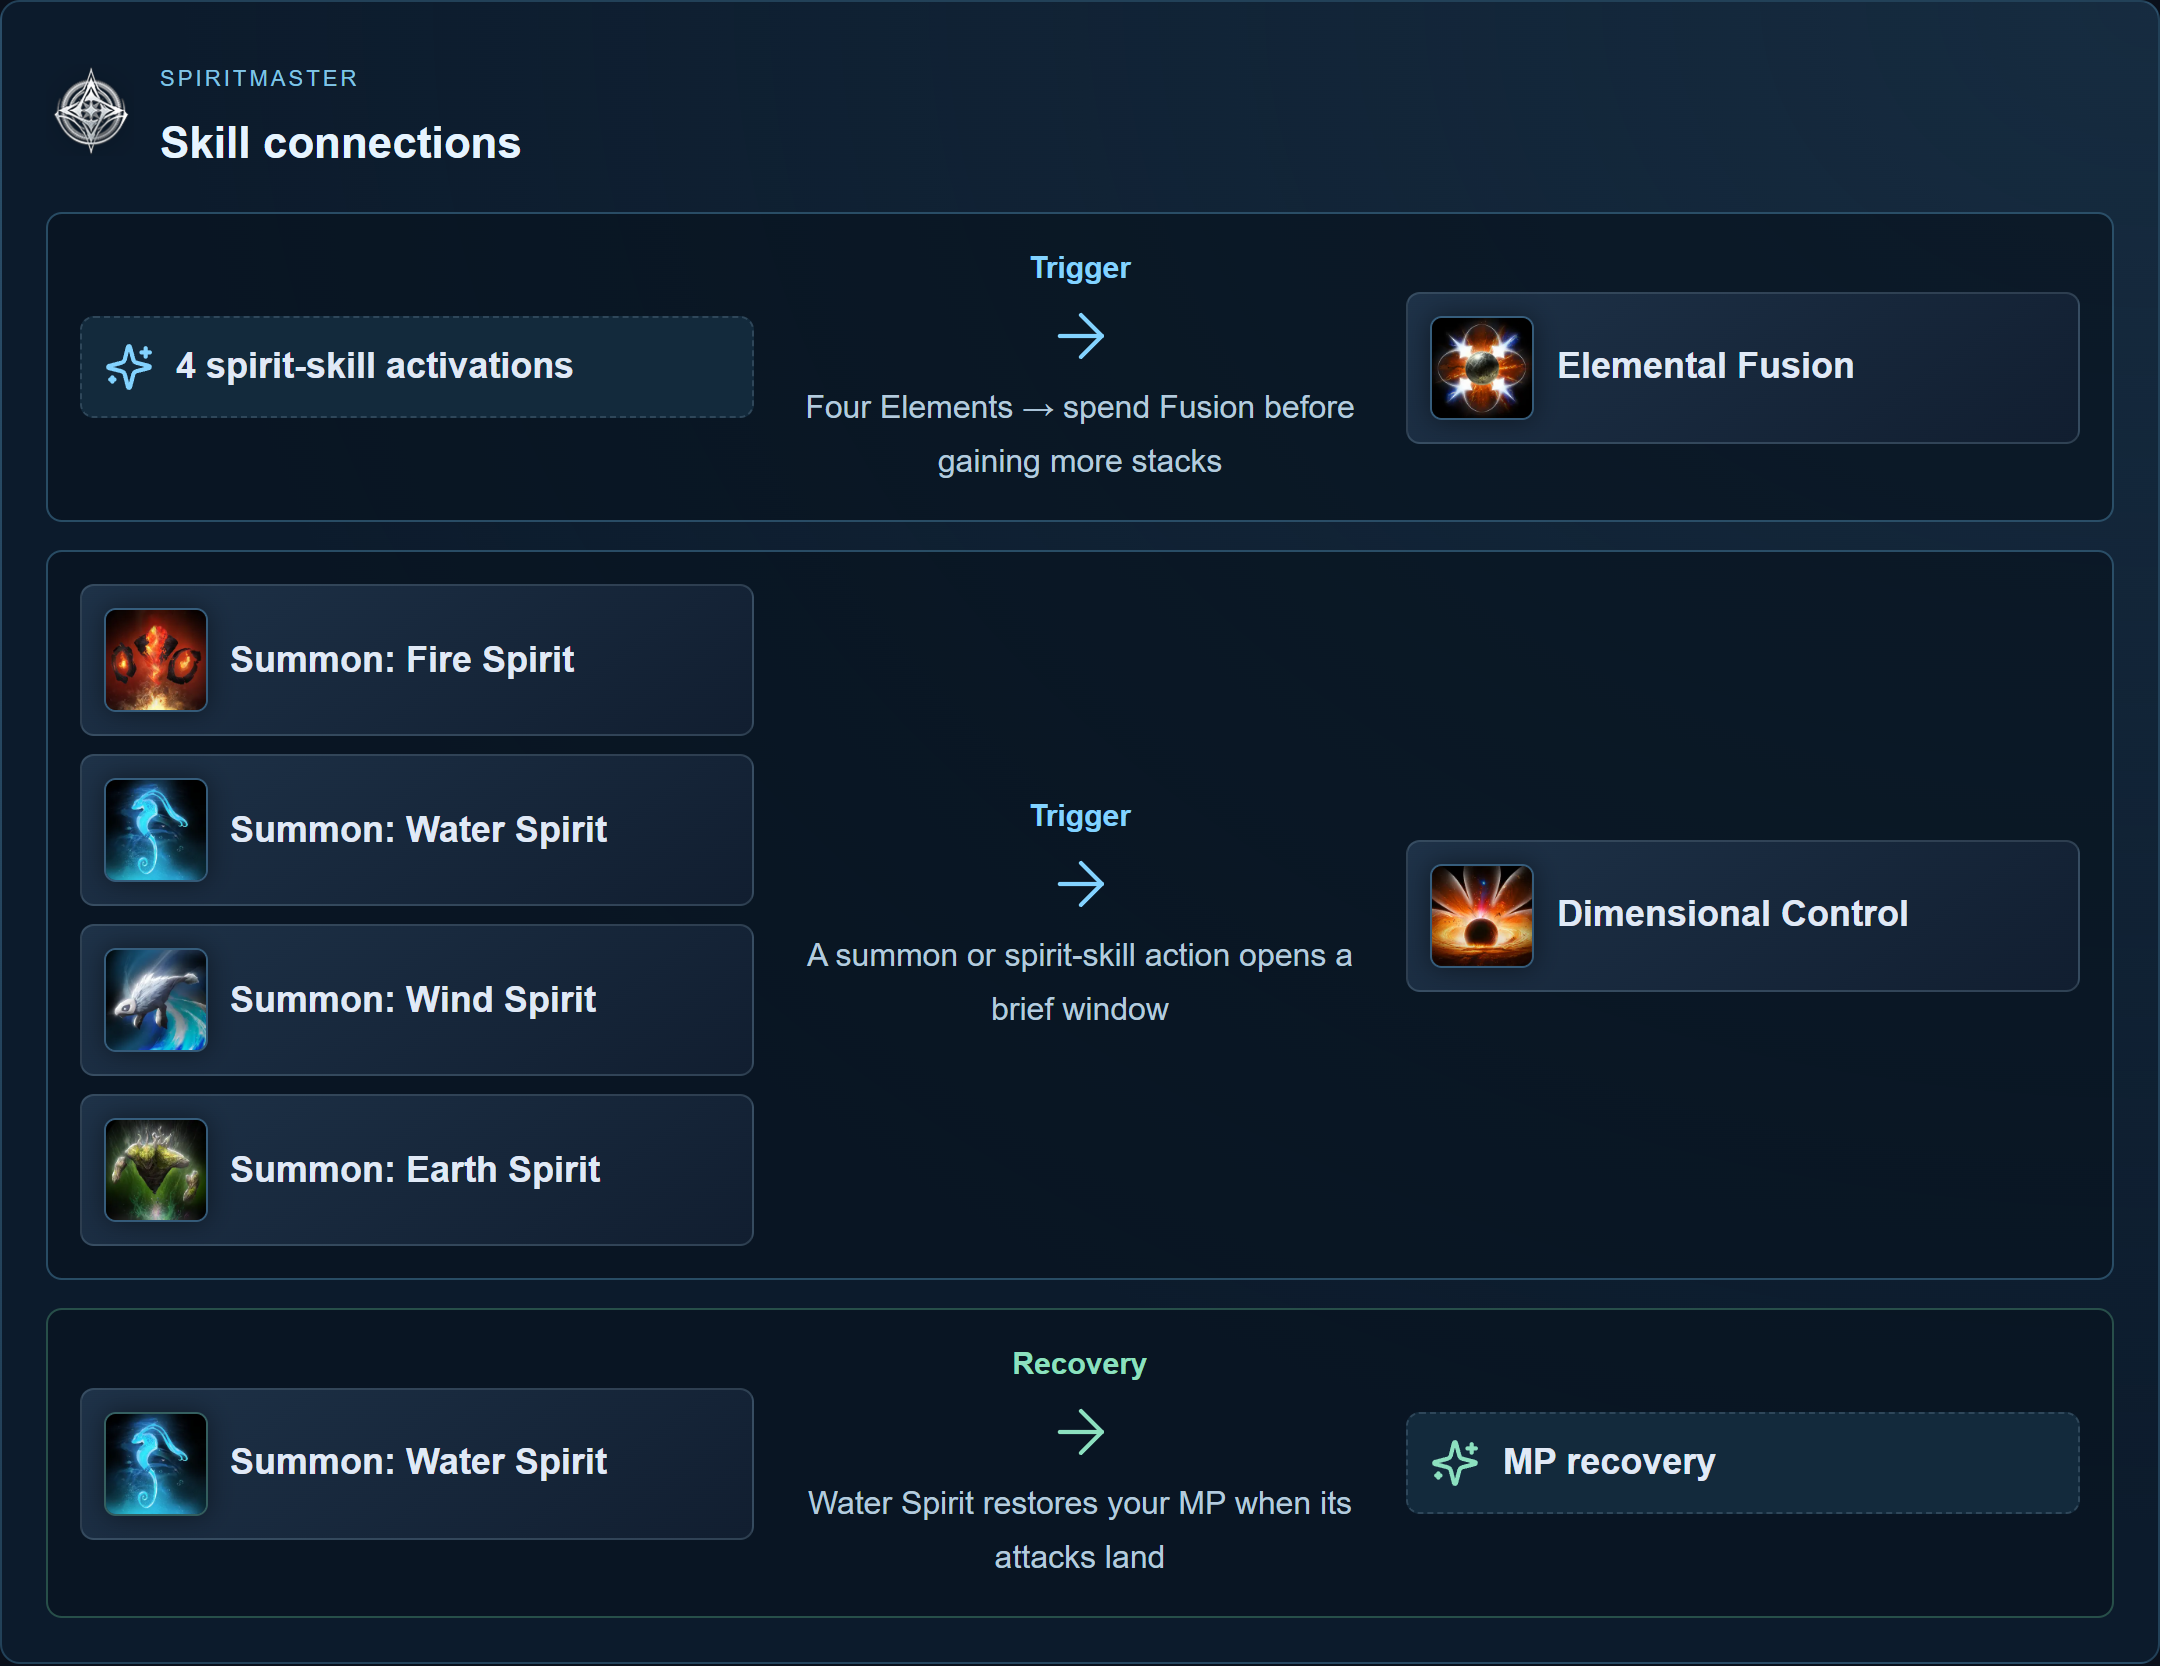
Four Elements → spend Fusion before gaining more stacks





A summon or spirit-skill action opens a brief window

Eight starting combat loops
| Class | Manual practice loop | Condition and separate control |
|---|---|---|
| Gladiator | Buffs → Ruinous Blow → Rage Burst → available Overhead Slam; Keen Strike and Rending Blow between cooldowns | Overhead Slam needs its target condition or Rage Burst. Keep Focused Block manual if tanking. |
| Templar | Shield Smite → Judgment; Warding Strike → Judgment; safe Punishment charge; Vicious Strike and Pummel between windows | Spend each short Judgment window before another trigger. Keep Taunt and shields independent. |
| Assassin | Buffs → approach behind target → Savage Roar stacks → Insignia Explosion; critical Heart Gore opportunities | Insignia lasts briefly on this target. Illusive Clone removes Heart Gore cooldown for its window, not permanently. |
| Ranger | Gale Arrow → Marking Shot → available Suppressing Arrow; Deadshot and Snipe; Drill Dart on a critical proc | Burst Arrow requires Slow or Root. Resume firing within range after movement. |
| Chanter | Rushing Smash → Spinning Strike → Dark Crush; later Impactful Crush or ranged Stigma → Dark Crush | Before selected rank-16 cooldown removal, wait between Dark Crush windows. Recuperation remains separate. |
| Cleric | Light of Regeneration → Debilitating Mark → Chain of Torment; equipped Earth Punishment → available Condemnation | Stop damage for urgent healing or Radiant Recovery. Condemnation reset needs its selected option and a critical hit. |
| Sorcerer | Damage buffs → fire attacks and available Blaze; safe Hellfire → Firestorm; Ice Chain → Winter’s Shackles | Blaze needs Fire Mark. Restore MP to preserve mana-dependent passive effects; keep defense reachable. |
| Spiritmaster | Useful spirit → available Dimensional Control → own attacks → Elemental Fusion when Four Elements appears | Four Elements comes from spirit skills. Spend it before more stacks; choose Water for MP or Wind for HP. |
Keep reactions outside the damage chain
These are starting priorities, not one fixed endgame rotation. Use only equipped and unlocked skills. Attack buffs belong before a window you can finish; a control-dependent follow-up belongs after its actual trigger. The class pages explain alternate slots, passives and skill lists.
Keep Defiance, timed blocks, emergency healing, cleansing, resurrection and situational movement outside the repeating damage chain. Stagger-only attacks also wait for Stagger; they are not ordinary filler. A critical-hit proc cannot be guaranteed by putting its button next in a combo.
Practice the normal loop, then test returning after movement and interrupting for your party job. Only combine the attacks you want repeated in that order. The in-game macro guide covers combo controls; another character's cooldown reduction and attack speed can change its timing.
Use the skill build planner
Open the AION 2 Build Planner, choose your class and faction, then use Skills to change ranks with Raise / Lower. Select specialization options and track the point totals as you change them. Keep the planner's available slots and bonus-rank inputs consistent with your character.
Use the current plan to compare two allocations before spending points in game. Its local plan is stored in that browser; account-based Save to My Builds requires signing in. Keep a separate record if you need the setup in another browser.
The planner helps budget points. It does not choose your encounter role or demonstrate that you can complete a cast while moving. Test the selected trigger, recovery and defensive response on your character.
Save a setup and fix its weak point
| Failure | Change to test first |
|---|---|
| MP runs out | Select the ordinary-attack MP option or reduce the cost of the repeated area attack. Check whether recovery attacks actually land. |
| A follow-up never appears | Check its target status, critical proc, resource or short activation window before adding more damage buttons. |
| Copied cooldowns do not match | Check selected cooldown options and total skill ranks, including bonuses lost when equipment changed. |
| Charged attacks keep stopping | Choose speed or mobility where offered, or start the charge in a longer safe window. |
| Party recovery is insufficient | Replace the least useful damage Stigma with the needed heal, shield or cleanse. Keep it on a reachable control. |
| Two support classes duplicate a buff | Chanter Undefeated Mantra and Cleric Light of Protection do not stack their damage boost; Templar Fury and Gladiator Experienced Counterstrike also overlap. |
Save the class, activity, party role, equipment and Arcana, purchased and bonus skill ranks, selected specializations, equipped Stigmas and Daevanion route. Keep the working version before changing points.
Compare one change against the same enemy with the same gear and fight length. Record MP, successful follow-ups, interrupted casts and whether support was available, alongside damage. A larger burst that prevents the next healing response is a poor improvement for a healer. Prepare a separate PvP setup for control, escape and recovery under pressure.