For party PvE, put a direct heal, cleanse, and resurrection on separate reachable controls, then use Debilitating Mark → Chain of Torment → Earth Punishment and available Condemnation attacks. Equip party protection and Noble Aura when the group needs their benefits; exchange damage for healing if recovery is the problem.
Official Cleric class artwork
Watch the attack animations, movement and weapon style.
Watch on YouTube
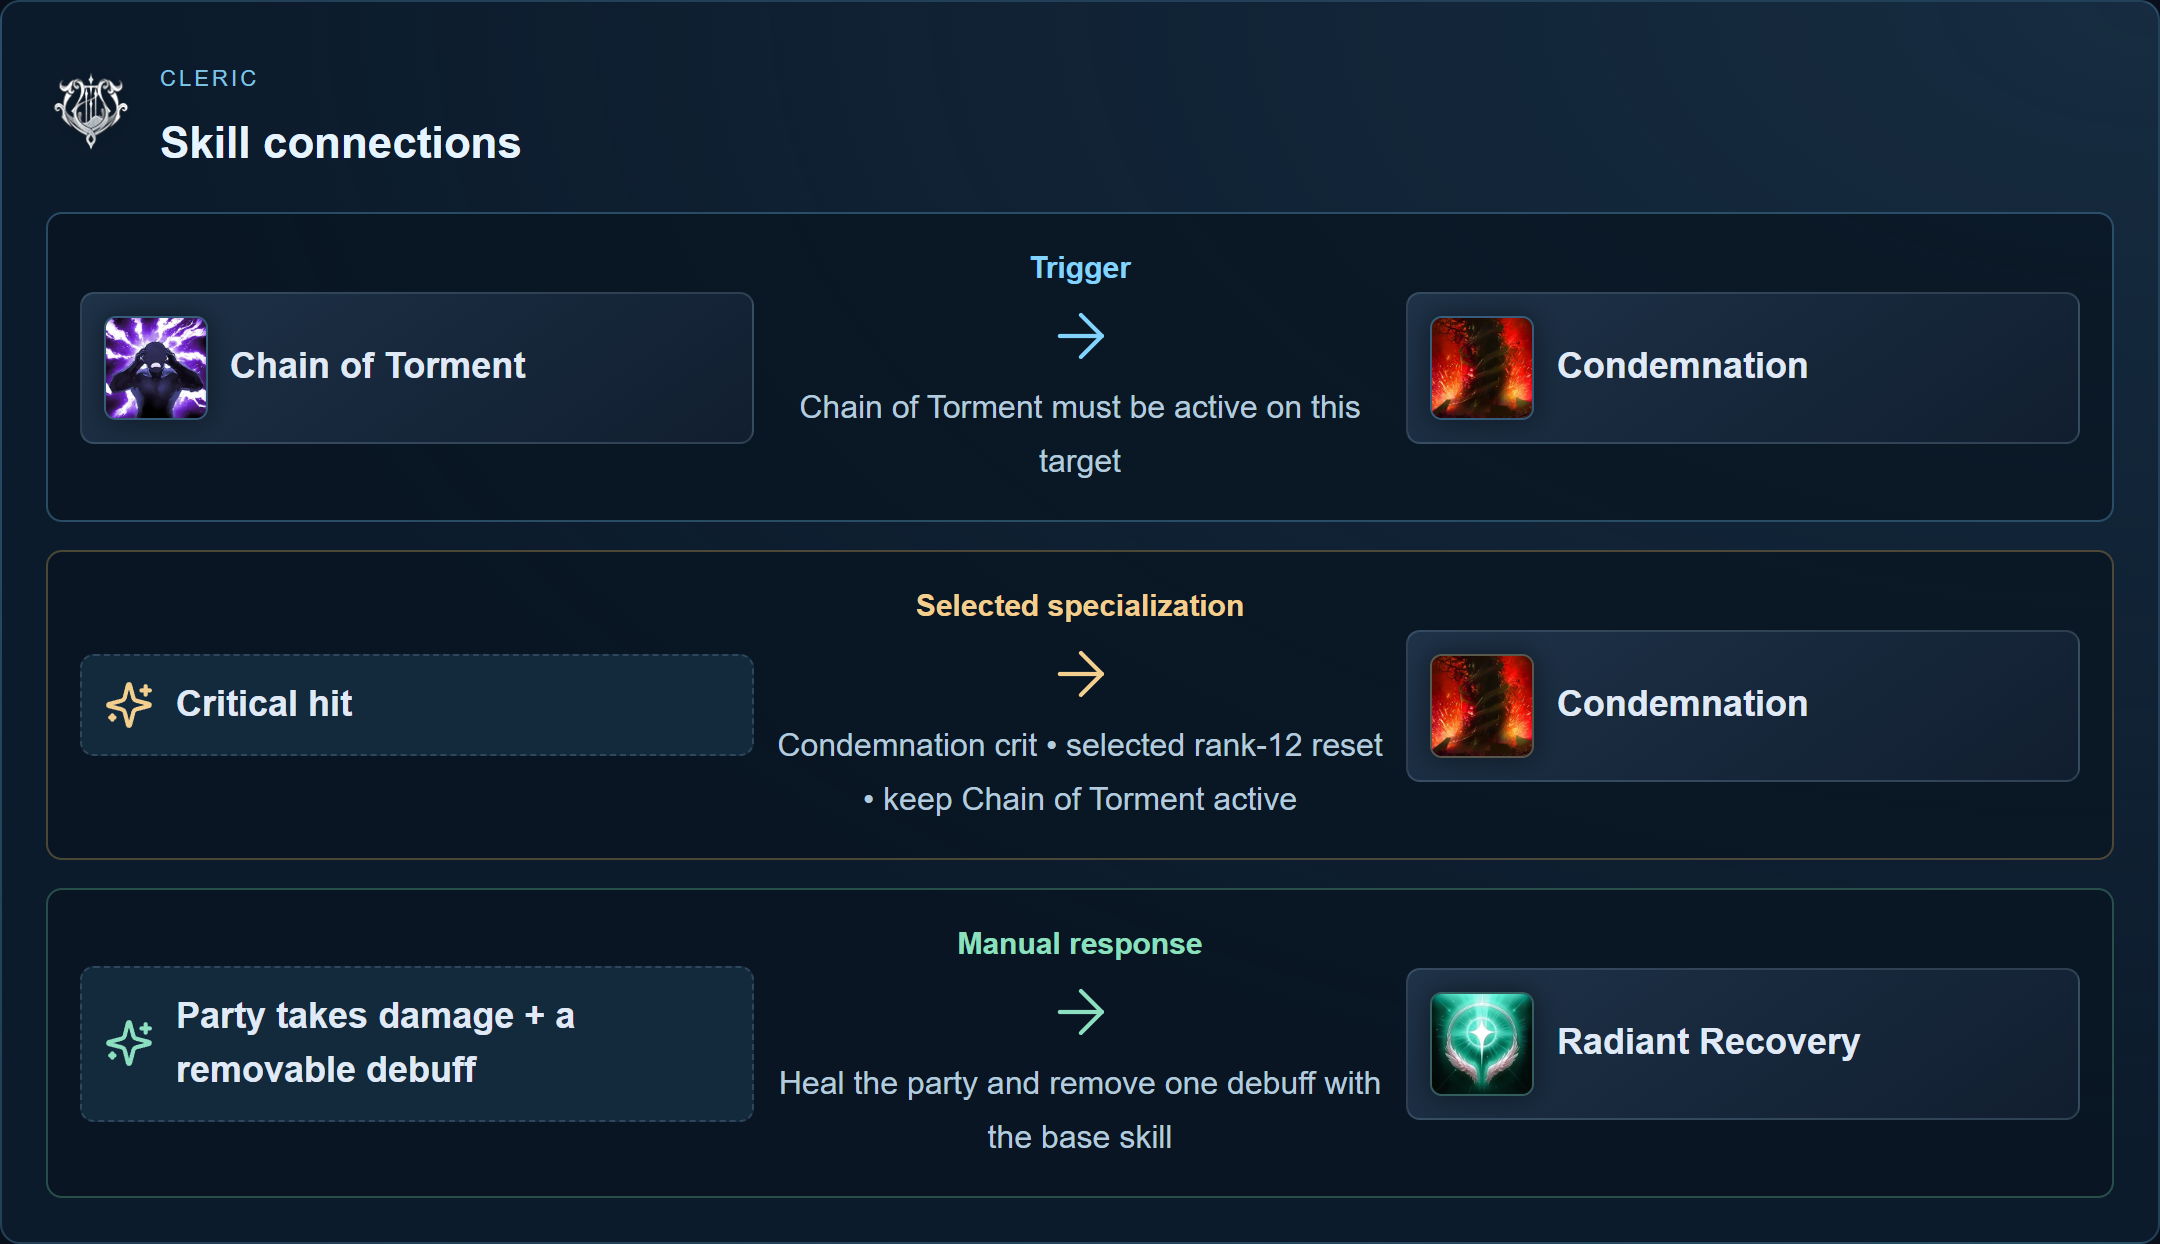
Follow the arrow to see what opens or improves the next skill. Select a skill for its full explanation.


Condemnation crit • selected rank-12 reset • keep Chain of Torment active
Heal the party and remove one debuff with the base skill

Choose the setup for today's content
| Situation | Starting emphasis | Adjustment trigger |
|---|---|---|
| Solo questing | Reliable damage with self-recovery available | Add recovery when pulls interrupt your progress |
| A regular dungeon party | Healing, cleanse, resurrection, and useful boss debuffs | Add an emergency heal if routine damage becomes difficult |
| Party with a Chanter | Check the Chanter's buff coverage before duplicating protection | Swap only after reading the actual effects and agreeing coverage |
| Party without a Chanter | Consider party protection | Preserve it if its protection or damage benefit is needed |
| Learning a high-pressure encounter | Give healing and defensive reactions more room | Trade a marginal damage option for the tool that addresses the wipe |
Maintain useful boss debuffs while watching the party. Ordinary damage calls for healing, a removable harmful effect calls for cleanse, and a dead ally needs resurrection in a safe window.
A concrete starting Stigma example
Start with the following four-role model. If fewer slots are unlocked, preserve the recovery your party depends on before adding extra damage.
| Stigma choice | Why it is considered | When to reconsider it |
|---|---|---|
| Light of Protection | Adds useful party offense and protection | A Chanter may already cover overlapping effects |
| Summon Resurrection | Restores an ally after a death | Keep it accessible when the group relies on you for recovery |
| Earth Punishment | Supports damage and debuffs | Check the available skill level and interaction in your tooltip |
| Noble Aura | Adds continuing damage | Replace with an extra healing option if the encounter needs it |
Replace Noble Aura with Absolution or Benevolence when the party needs more healing. Prayer of Amplification is another damage choice. Light of Protection’s damage boost does not stack with Chanter Undefeated Mantra; the higher skill level applies, with Mantra taking precedence at equal levels.
Summon Resurrection restores a fallen party member within 40m. Its rank-5 option shortens casting; use a safe window.
Two choices to make before the dungeon
With a Chanter and insufficient healing: compare the actual buff effects, then replace a redundant protection or Noble Aura slot with Absolution or Benevolence. Test recovery before removing another damage tool.
Without a Chanter and without a Condemnation reset: retain needed protection and resurrection, apply the three debuffs manually, and use Condemnation when available. Check its selected option before investing in a reset-based sequence.
Damage and debuff order
Starter skill and option card
| Skill / control | Select or prepare | Use it for |
|---|---|---|
| Debilitating Mark → Chain of Torment → Earth Punishment | Available debuff skills; select their unlocked options | Apply and refresh debuffs |
| Condemnation | Chain of Torment on target; select the rank-12 critical-hit reset | Use when available; repeat only when the reset actually occurs |
| Radiant Recovery | Base skill heals the party and removes one debuff; rank 8 can remove more | Remove a relevant harmful effect on a separate control |
| Light of Regeneration | Use its party healing over time; rank 12 adds movement speed | Recovery and movement utility |
| Healing Light and Summon Resurrection | Reachable controls outside repeated attacks | Direct recovery and a safe resurrection cast |
Manual loop: Debilitating Mark → Chain of Torment → Earth Punishment → available Condemnation and ordinary attacks → refresh expired debuffs. Interrupt for healing or cleanse; resurrect in a safe window. Without a Condemnation reset, continue your available attacks.
Healing, cleanse, and resurrection decisions
Keep a direct heal, Radiant Recovery, and resurrection on reachable controls outside a repeating damage sequence. Look at the party and encounter before committing a major recovery button. Removing the cause of damage can be more useful than repeatedly healing through it.
Radiant Recovery heals you and party members within 40m and removes one debuff without a specialization. At rank 8, choose increased cleansing when one removal is insufficient, an extra use for successive recovery, or lower cooldown for frequent casts. Keep it separate from damage.
Choose the recovery that addresses the damage and cast in a safe window.
- Check the immediate danger
Move or protect yourself if the current mechanic would interrupt or kill you during recovery.
- Identify the needed response
Distinguish ordinary damage, a removable effect, and a dead ally; check what your available skill can address.
- Stabilize safely
Use the needed heal or cleanse, or find a safe resurrection window. Keep these controls outside damage repetition.
- Resume useful damage
Once the party is stable, refresh debuffs and resume available attacks.
Read the failure before choosing a recovery button
| What happened | Useful response to check | What to avoid |
|---|---|---|
| An ally takes ordinary damage | An available direct heal and a safe cast position | Continuing damage while recovery is urgently needed |
| A harmful removable effect persists | Whether the effect is removable, the ally is within 40m, or several effects need removal | Assuming one cleanse removes every effect, including effects that cannot be removed |
| An ally dies during a dangerous mechanic | Resurrection availability and a safe casting window | Starting a cast that makes you the next casualty |
| The party is stable but debuffs have expired | Reapply the intended debuffs, then resume available damage | Assuming the later reset exists because the skill name matches |
How much healing should I equip? Start with direct healing, cleanse, and resurrection. Add Absolution or Benevolence when the party cannot recover from routine damage.
Should I cast resurrection immediately? Restore the ally when the casting window is safe. Another death caused by ignoring the mechanic can make recovery harder for the whole party.
For the complete skill list, use the Cleric class guide. Healing Light heals you and automatically selects the lowest-HP party member within 40m; it does not normally follow your enemy target. Light of Regeneration supplies party healing over time. Keep direct recovery for immediate damage, Radiant Recovery for removable effects, and resurrection for a safe recovery window.
Earth’s Retribution restores MP and its selected rank-12 Discharge effect shortens Bolt. Chain of Torment enables Condemnation; the latter’s rank-12 critical reset only works when its hit is critical. Healing Enhancement converts attack into Heal Boost, so attack contributes to healing as well as damage.
Gear and Daevanion priorities
Compare attack, critical effects, double-attack effects, accuracy, and cooldown reduction. Address missed hits first, preserve enough survival to cast safely, and then improve damage or recovery where the encounter needs it.
Before spending scarce resources, compare a proposed Daevanion route with the skills and passives you use. Avoid investing in a later build's path solely to match its screenshot. Save your current region, level, selected skill options, and equipped Stigmas alongside the plan. The builds guide provides a repeatable setup checklist.
Equipment examples
Compare equipment attributes, then choose items that match your class and level.

Spiritforged Mace
Unique · Mace- Required character level
- 1
- Item level
- 45
- Enhancement limit
- +15
Class: Cleric
Base attributes and enhancement bonus
- Attack
- 160–206
- Accuracy
- 100
- Critical Hit
- 50
- Block
- 50
Item details
Fixed secondary attributes
- Might
- 15
- Critical Hit
- 16
- MP
- 57
- Block
- 23
Magicstone / godstone slots: 4 / 1
Obtained from: Quest

Worn Mace
Common · Mace- Required character level
- 1
- Item level
- 1
- Enhancement limit
- +5
Class: Cleric
Base attributes and enhancement bonus
- Attack
- 4–5
- Accuracy
- 100
- Critical Hit
- 50
- Block
- 50
Item details
Magicstone / godstone slots: 1 / Not provided
More equipment examples (5)
Prepare a separate PvP setup
Before PvP, adjust survival, pressure on enemy targets, healing access, and your team role. Keep recovery and defensive reactions reachable while moving or under attack.